Hello Alpha
In most lab topologies, the scale of the network is quite small, and there is little or no traffic, so you can’t readily appreciate the benefits of features such as OSPF stubs. This feature is used to minimize the number of useless entries within a router that is found within a stub area. Take a look at the following topology:
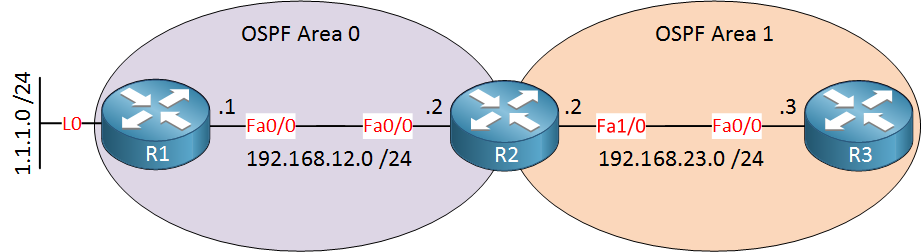
Imagine that behind R1, instead of only a single prefix of 1.1.1.0/24, there are many more networks with hundreds of prefixes coming from other areas as well as from autonomous systems outside of OSPF. Without the configuration of any stub networks, R3 would have, in its routing table, hundreds of prefixes for all those networks. This means that each packet that R3 sends anywhere will need to be checked against all of these hundreds of entries, resulting in a lot of wasted CPU and memory.
If you were to take a look at R3’s routing table in such a case, you would see that the next hop IP for all of the routes would be 192.168.23.2, which is R2. This is the case because area 1 is a stub area. By definition, a stub area has only one exit from the area.
When you configure a stub area, and block various types of LSAs, what you are doing is eliminating all of these prefixes in R3, with a single default route for all traffic that is directed to 192.168.23.2. You can understand that reducing the size of a routing table from hundreds of prefixes to one single prefix is quite efficient.
This is not evident in a small lab topology, but in an enterprise network, it is quite evident.
I hope this has been helpful!
Laz