An excellent explanation of these notations can be found at the following link:
Note here that the (S, G) notation is used to refer to the shortest path tree (SPT) distribution tree. This is when no single shared root of the tree is being used. In other words, this is when no Rendevous Point (RP) is being used.
Whenever an RP is being used, then the notation changes to (,G), which refers to the fact that a Shared Distribution Tree (SDT) is being used. The (,G) notation always refers to this.
Thanks for the reponse Laz, I understand the difference between SDT & SPT but here’s where I get confused:
Even when running PIM dense mode with no RP, when I issue ‘show ip mroute’ I will see (1.1.1.1, 239.1.1.1) AND I will also see (,239.1.1.1). The (,239.1.1.1) will be for a device that has registered via IGMP to receive that multicast group. In this instance it doesnt have any link to sparse mode and RP as it is an IGMP join message.
So when is it used by IGMP join and then PIM Sparse mode as SDT? I’m confused by the notation (*,239.1.1.1) and its meaning when used by PIM Sparse RP and IGMP join.
I understand that for PIM Sparse RP the format is a wildcard for sources, but it is confusing that it is also used for IGMP join.
Thanks for the clarification of your question. If you take a look at this lesson, you will see that Rene deals specifically with this question.
Under the section titled “Multicast Routing” he states that PIM dense mode doesn’t use an RP, but, Auto RP Discovery is enabled whenever you enable PIM and the router will listen to the Auto RP group address of 224.0.1.40, so you will se an entry like (*, 224.0.1.40) even though an RP is not being used.
Now specifically for the join message, he mentions a little later on, the following:
R2#show ip mroute 239.1.1.1

(*, 239.1.1.1), 00:00:19/00:02:51, RP 0.0.0.0, flags: DC
  Incoming interface: Null, RPF nbr 0.0.0.0
  Outgoing interface list:
    GigabitEthernet0/3, Forward/Dense, 00:00:19/stopped
    GigabitEthernet0/2, Forward/Dense, 00:00:19/stopped
    GigabitEthernet0/1, Forward/Dense, 00:00:19/stopped
Above we can see that R2 has created an *, 239.1.1.1 entry for multicast group 239.1.1.1. At this moment however we are not receiving any traffic for this group so we don’t know what the source is and we can’t forward anything.
Now later on he generates multicast traffic and we can see that the routing table has changed to include the notation for SPT that we are familiar with such as (192.168.1.1, 239.1.1.1).
So the (*,G) notation for the join message in this context simply means that we are not receiving traffic for this group, and we simply don’t know the source of it yet.
Hi Rene,
I have a question. In the example where you disable SPT joining on R4, it will start receiving the multicast traffic from source 192.168.1.1 through R2 instead of the shortest route R1-R4. But going back to the earlier chapter’s concept of RPF check, will RPF check fail here on R4 when it receives multicast from 192.168.1.1 as the unicast routing table on R4 has next hop interface towards R1 for 192.168.10 ? Or am I missing something?
This is an excellent question, and it shows that you are thinking critically and combining multiple concepts in your mind. If you take a look at the Multicast RPF (Reverse Path Forwarding) lesson, you will note that when the RPF check fails, it is because there is multicast traffic being received from an RPF neighbor that is not specified in the multicast routing table. Multicast traffic is received from IP address “X” when the RPF neighbor is actually “Y” in the multicast routing table.
In the example you are referring to, you will notice that you have two entries in the multicast routing table, one because R4 has joined the RTP, but also one because R4 has joined the STP specifically for traffic sourced from S1. This results in the following two scenarios:
For multicast traffic coming from R2, any source will do, and since the IP address of R2 is in the multicast routing table, the RPF check will succeed.
Similarly, for multicast traffic coming from R1 that is sourced from S1, this too will pass the RPF check because the IP address of R1 is in the multicast routing table (STP traffic) and the source IP is specified.
So in this scenario, the RPF check succeeds because the “RPF nbr” indicator in the routing table is satisfied.
Hi Laz,
Thank you for the detailed explanation. and I this I understand it now. In short, when we use RPT, the RPF check is for the RP address and in SPT the check is for source ip address of the multicast, is that right?
Looking at a cisco doc, it seems to say the same.
“All preceding sources of RPF data are searched for a match on the source IP address. When you use Shared Trees, the RP address is used instead of the source address.”
What you see in your output is normal behaviour. Whenever you enable sparse mode on an interface, an “invisible” tunnel interface is created that uses the same IP address as the interface on which the feature was enabled. In your case, tunnel0 is created which uses the same IP address as the loopback interface, since you enabled sparse mode on it.
These tunnel interfaces are created to encapsulate the first multicast packet in a PIM register message and to forward it to the RP. You will also see that the RP gets two tunnel interfaces, the second is used to decapsulate the PIM register packet it receives.
Now these tunnel interfaces cannot be seen in the regular configuration but they can be seen using the following command:
show ip pim tunnel
You should get something like this:
R1#show ip pim tunnel
Tunnel0
  Type       : PIM Encap
  RP         : 2.2.2.2
  Source     : 192.168.12.1
  State      : UP
  Last event : Created (00:00:22)
For the source as shown above, you should see the IP address of your loopback interface.
It seems show ip pim tunnel command is not available in 12.x version
R2#show ip pim tunnel
               ^
% Invalid input detected at '^' marker.

R2#show ip pim ?
  autorp      Global AutoRP information
  boundary    debug boundary command
  bsr-router  Bootstrap router (v2)
  interface   PIM interface information
  mdt         Multicast tunnel information
  neighbor    PIM neighbor information
  rp          PIM Rendezvous Point (RP) information
  rp-hash     RP to be chosen based on group selected
  vc          ATM VCs opened by PIM
  vrf         Select VPN Routing/Forwarding instance
does the RP address have to be that of a loopback interface? what if, on both the RP and other routers, the RP is specified as the address of a real interface?
can the RP ever be the first-hop-router? what about the last-hop-router? is any special configuration required to support these usages?
No the address used for the RP can indeed be that of a physical interface. For example, in the following lesson you can see that the address used for the RP is that of the interface.
However, it is considered best practice to use the IP address of a loopback interface in order to avoid loss of an RP in the event that the physical interface goes down.
The RP can be any router in your multicast topology. Typically, however, it’s a good idea to keep the RP as centrally located as possible in your topology, because remember, all of your multicast traffic will flow through that router. If it is on the edge of your network, then all multicast traffic will have to travel to the RP and back. Keeping it close to the middle will make your multicast network more efficient.
PIM v2 hello packet how many seconds once it will be sending to the neighbor?
How many seconds once join/prune message sending to the upstream router?
When we receive the PIM register stop packet, R1 will start a suppression timer. By default this timer is 60 seconds and when the timer is almost expired, R1 will send another packet: it will send every 60 seconds once to RP for register Null packet?
PIM hello packets contains 72bytes of size. ethernet header14 bytes +58 bytes of ipv4 packet size from that 20 bytes is header what about rest 38 bytes can u explain me that 38 bytes what its actually (PIM).
The default Hello_Period is 30 seconds as described in RFC 4601.
The default value of t_period, which is the period between Join/Prune messages, according to RFC 4601 is 60 seconds.
Yes, it will continue to send a null register packet to the RP every 60 seconds and the RP will respond with a PIM register stop message. This will continue until the RP is informed if interested receivers, at which time it will not send a stop message, and R1 will start forwarding the traffic.
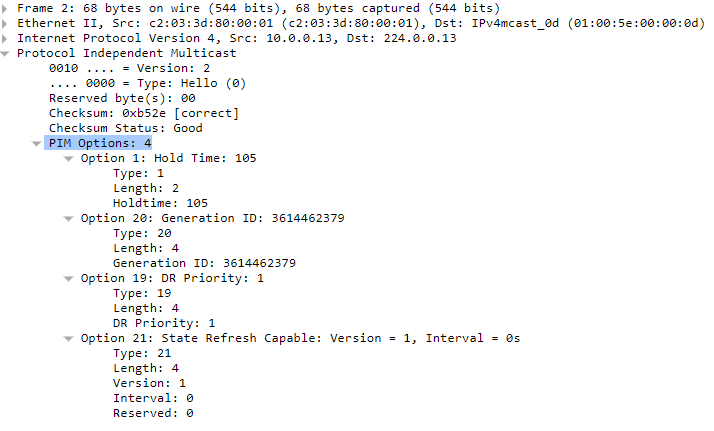
Take a look at this cloudshark capture of several PIM hello packets. You will see the various information found within the PIM packet. All PIM packets have the same structure, but simply have a different Type value, which indicates if it is a hello, a Join/Prune or any other type. You can see the specific header structure in RFC 4601.
In the payload of the hello packet specifically, you will see some reserved bytes, a checksum, and some PIM options including hold time and DR priority values among other things.
These options are used by PIM to transmit specific information relative to the type of PIM message being sent. You can view all of the PIM options at this IANA reference site.
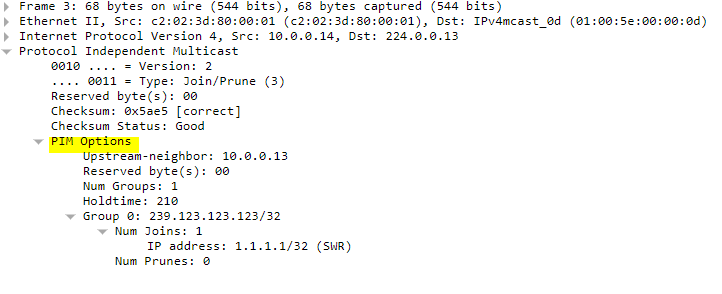
Looking at a different type of PIM message, the Join/Prune message, we see that we have other PIM options:
thanks for that information i am still trying to understand that bytes for an example take it as an pim hello packets its contains 68 bytes length again ethernet header 14 and ipv4 header 20 bytes totally 34 bytes and rest 34 bytes are pim. Now from that pim hello packet contains Pim options from that options how we can calculate each option have how many bytes. i expand each option its shows length that will that total bytes of that option correct me if i am wrong. still i am wondering how that 68 bytes cames.
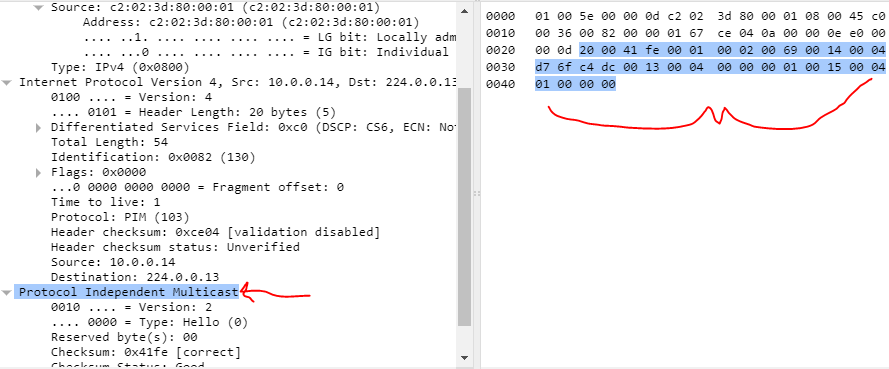
If you click on the various sections of the pane on the left, the actual bytes of that section (in hex) are highlighted in the pane on the right. By clicking the Protocol Independent Multicast section, you can see the highlighted bytes as shown below. Remember that every two hex characters are one byte (8 bits).
If you count the number of them in the output above, you will find that they represent 34 bytes.
Continuing in the same way, you can click on the Ethernet header and you will see that 14 bytes are highlighted, and similarly for the IP header, 20 bytes are highlighted.
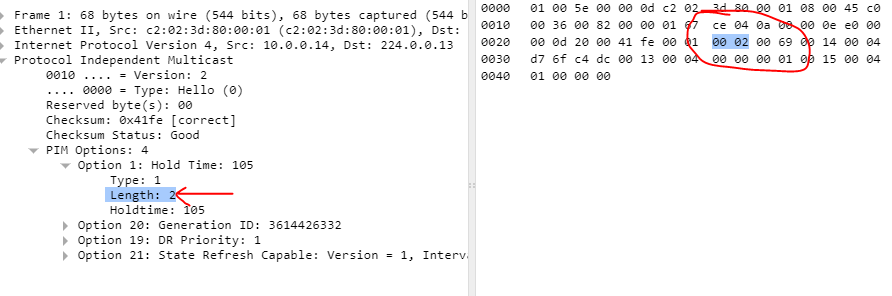
Now within the hierarchy of the left pane, you can click on individual sections, and actually see in which bytes this information is kept. So for the full 34 bytes of the hello packet, you can click on each portion of the options and subsections, and you can see the sizes of each. Look at the following for example: